
28 Apr 2014
Record Google Earth Using Tools That Don't Suck
##The Problem
For April’s tasting I wanted to have video clips that took us to the location of each distillery. Google Earth does a really good job of rendering that. The only problem is only the pro version can record videos natively, and the first guides I found on Google recommended using awful tools. After a bit of experimenting I discovered that this doesn’t have to be hard. The key is using tools that don’t suck.
##Set Up Google Earth
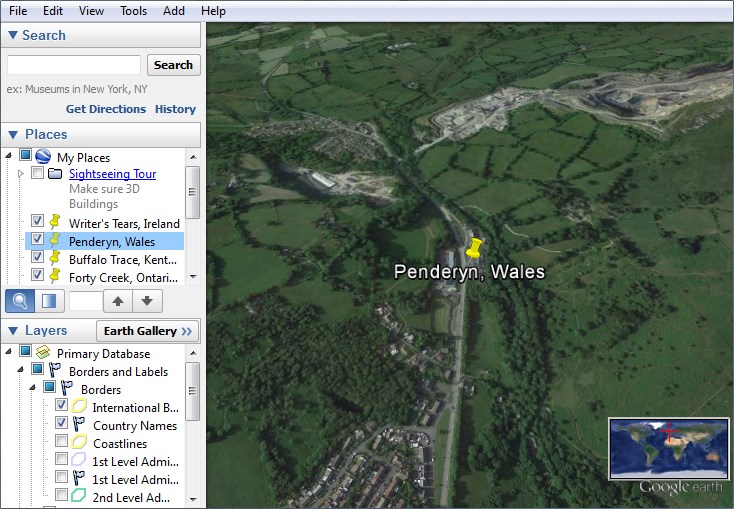 Search for the places you want to visit and add them to your list. You can add a search result to your places from the right click menu. It’s possible to record a tour that visits places automatically for you, but it leaves controls visible on the screen so I don’t recommend it.
By default Google Earth’s view is a little busy so turn off layers you don’t want to see in the bottom-left pane. I used only borders and country names.
Inside the View menu set Show Navigation to Never. Maybe turn on the Overview Map if you’d like to add some context. The View Size menu contains all the most common video formats so pick the one that matches your desired output. I think 720p is usually a good choice. Don’t worry about the place and layer controls on the left, they won’t be included in this video.
If you have multiple monitors leave Google Earth on your main monitor. When we record only the main monitor gets recorded.
##Record with VLC If you’re not using VLC then your video player might be prettier but it definitely doesn’t have more features. VLC is rock solid and will play any audio or video file you throw at it. It doesn’t suck.
We’re going to use a super-hidden feature in VLC to record the desktop. From the Media menu click Open Capture Device and set Capture Mode to Desktop. Set the framerate to something sensible like 30. Now for the real secret click the arrow beside Play and choose Convert.
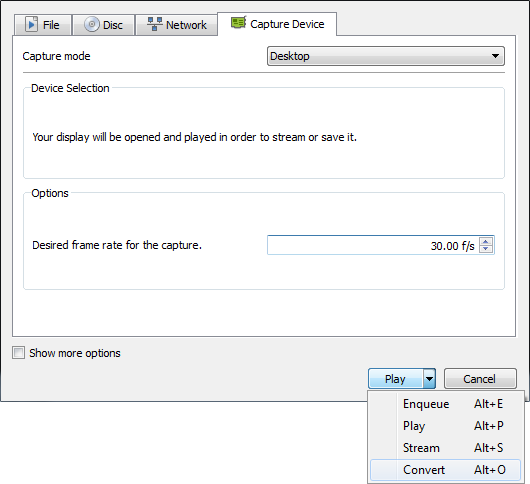
From this screen configure your output codec. If you don’t have a strong preference the defaults are probably fine. You may want to turn off audio though.
Click Browse to choose where to save the file.
We’re now ready to record. If you haven’t already make sure Google Earth has visited each of your locations at least once this session so the tiled data is cached. Click Start and start going through the locations for your video.
##Crop and Cut with FFmpeg FFmpeg is the workhorse that powers VLC’s coding and decoding capabilities. It also doesn’t suck. Technically we’ve already used it but now we’re going to need the command line tools.
Run ffmpeg -h and revel in the longest help output I have ever seen.
Only a few of the commands are relevant here. There’s the command to crop video:
ffmpeg -i YourMovie.mp4 -vf "crop=W:H:X:Y" YourCroppedMovie.mp4
and the command to cut into a shorter clip.
ffmpeg -i YourMovie.mp4 -ss HH:MM:SS -to HH:MM:SS -async 1 YourCutMovie.mp4
VLC is going to help us plug in the right values. Open the recoded movie and find the crop video filter (Tools → Effects and Filters → View Effects tab → Crop subtab). Play with these values until only the Google Earth view is in the frame.
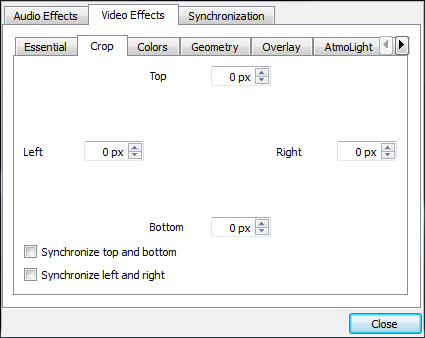
The Top and Left values replace X and Y in the command. Right - Left and Bottom - Top replace W and H respectively. If you chose a view size in Google Earth those dimensions will be the same width and height.
Play your recorded clip and note the times you want to start and stop the finished video. When put all together the command will look something like this:
ffmpeg -i YourMovie.mp4 -vf "crop=1280:760:629:89" -ss 00:00:05 -to 00:01:03 -async 1 YourFinalMovie.mp4
##Execute That And You’re Done Yay!
Til next time,
The Whisky Oriented Development team
